VS Code extension
A key tool for leveraging JuliaHub capabilities is the JuliaHub VSCode extension which provides a seamless way to execute julia scripts in the cloud directly from a local IDE. This tutorial highlights the key steps and features to best take advantage of its capabilities.
Getting started
To use JuliaHub through the VSCode extension, an account must first have been created on JuliaHub.
The Julia language support must also have been added to VSCode, as documented in the Julia extension documentation.
Then, the JuliaHub extension can be added (search for JuliaHub in the View > Extensions menu). After its installation, the JuliaHub extension logo should appear in the left menu panel.

Job Submission Dialog
When you click on the JuliaHub extension icon, you'll see the job submission dialog.
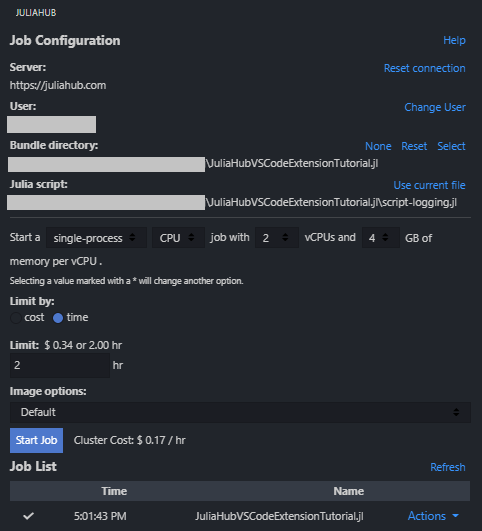
This interface allows you to configure and submit Julia scripts to run on JuliaHub's cloud infrastructure. Here are the key components:
Julia Script: The script file you want to execute on JuliaHub. You can click "Use current file" to select the currently open file in the editor, browse and select any Julia script from your workspace, or type a path. The script must be saved to disk before submission.
Bundle Directory: Specifies the project directory containing your
Project.tomlandManifest.tomlfiles. This ensures all dependencies and source code are available during execution. Options include:- None: Run the script standalone without project dependencies
- Reset: Clear the current selection
- Select: Choose a directory containing your Julia project
Appbundles The JuliaHub VS Code extension always submits the job as an appbundle. To find out how appbundles work (including a way to exclude files with a
.juliabundleignorefile), refer to the JuliaHub.jl documentation.Node Type: Select the computational resources for your job. Various configurations are available (e.g., "2 vCPUs, 4GB Memory"). Choose based on your workload requirements - more powerful nodes are available for computationally intensive tasks.
Mode: Determines how the job executes:
- single-process: Standard execution on a single node
- distributed: Enables multi-node execution for parallel computing (requires Distributed.jl)
Limit: Set the maximum runtime for your job in hours. Jobs will be terminated if they exceed this limit.
Image Options: Select the Julia environment image. "Julia (standard-base)" is the default Julia installation. Other specialized images may be available based on your JuliaHub configuration.
Job Name: Optional custom name for your job. If left empty, a default name will be generated.
Inputs: Configure additional inputs or parameters for your job execution.
Start Job: Submits the configured job to JuliaHub. The button will be disabled if required fields (like Julia script) are not properly configured.
Accessing DataSets and Private Registries
The JuliaHub IDEs automatically configure your session to use JuliaHub as a DataSet store and have any private registries available. When using a local IDE, you must take a few additional steps to connect these features.
First, ensure that the Package Server is pointing to JuliaHub or your local instance. This may be configured either as an environment variable (JULIA_PKG_SERVER) or as the Julia: Package Server setting in the Julia VS Code extension. You may need to restart Julia for this to take affect, and confirm using Pkg.pkg_server():
julia> using Pkg

julia> Pkg.pkg_server()
"https://juliahub.com"
Note that if you have a dedicated company JuliaHub like example.juliahub.com, you want to use that here.
Registries
To access private registries, you need to add them:
julia> using Pkg

julia> Pkg.Registry.add()
Note that if you see a Warning: could not download https://juliahub.com/registries, you need to authenticate into JuliaHub. Do that with the JuliaHub package:
julia> Pkg.add("JuliaHub")

julia> using JuliaHub

julia> JuliaHub.authenticate()
JuliaHub.Authentication("https://juliahub.com", "user", *****)
DataSets
To connect to the JuliaHub DataSets, you must use both DataSets and the JuliaHubData packages:
julia> Pkg.add(["DataSets","JuliaHubData"])

julia> JuliaHubData.connect_juliahub_data_project()
JuliaHubData.JuliaHubDataProject [https://juliahub.com]:
  📄 # ...
If you see an error that JuliaHubData is not found in the project, manifest or registry, you must ensure you've added the private registries.
Executing a script
The code of this tutorial performs a simple simulation to estimate the value of π. The idea is to randomly generate 2-dimensional points over a square and then assess whether those points belongs or not to the inscribed circle (figure generated with plot-simul.jl).

The value of π can be inferred based on the following relationship between the areas of the square and circle:
\[\begin{aligned} \frac{n_○}{n_□} \approx \frac{A_○}{A_□} = \frac{\pi r^2}{4*r^2} = \frac{\pi}{4} \end{aligned}\]
The associated program to perform this estimation is in src/VSCodeExtension.jl:
function estimate_pi_single(n)
    n > 0 || throw(ArgumentError("number of iterations must be > 0, got $n"))
    incircle = 0
    for i = 1:n
        x, y = rand() * 2 - 1, rand() * 2 - 1
        if x^2 + y^2 <= 1
            incircle += 1
        end
    end
    return 4 * incircle / n
end
To use that code, a launcher script ./script_single.jl is included in the main folder and is adapted for a job launched on JuliaHub:
using VSCodeExtension
using JSON3

n = 1_000_000_000

stats = @timed begin
    estimate_pi_single(n)
end

@info "Finished computation. π estimate: " stats[:value]

results = Dict(
    :pi => stats[:value],
    :num_trials => n,
    :compute_time => stats[:time]
)

open("results.json", "w") do io
    JSON3.pretty(io, results)
end

# Write summary results (displayed in JuliaHub job output table)
open(ENV["JULIAHUB_RESULTS_SUMMARY_FILE"], "w") do io
    JSON3.pretty(io, results)
end

# Copy full results file to the upload directory
cp("results.json", joinpath(ENV["JULIAHUB_RESULTS_UPLOAD_DIR"], "results.json"))On legacy (v1) job images, use environment variables instead:
ENV["RESULTS"] = JSON3.write(results)
# Point the env at the results file created
ENV["RESULTS_FILE"] = "results.json"
Once you've configured the job parameters in the dialog, click "Start Job" to submit your script to JuliaHub. The job will be queued and executed according to the specified configuration.
Accessing results
The above script is like any other valid one for running locally, except for the use of two special environment variables at the end:
JULIAHUB_RESULTS_SUMMARY_FILE: path to write a JSON file whose key-value pairs are displayed in the job output table accessible from theActionsmenu associated with each job found in theJob Listsection. The summary is limited to 1000 characters.JULIAHUB_RESULTS_UPLOAD_DIR: a directory where any files placed will be uploaded and available for download after job completion. These files are accessible from the JuliaHub menu in the VSCode extension (Actions > Download results) as well as on the online platform under theCompute > Job Listsection. The total size of files in this directory is limited to 5 GiB.
Multiple result files can be placed in JULIAHUB_RESULTS_UPLOAD_DIR:
# Save multiple output files to the upload directory
cp("plot.png", joinpath(ENV["JULIAHUB_RESULTS_UPLOAD_DIR"], "plot.png"))
cp("results.json", joinpath(ENV["JULIAHUB_RESULTS_UPLOAD_DIR"], "results.json"))On legacy (v1) job images, results are communicated via environment variables:
RESULTS: set to a JSON string (e.g. usingJSON3.write). Values are displayed in the logs accessible from theActionsmenu for each job in theJob Listsection.RESULTS_FILE: set to a file path containing results. This file is accessible from the JuliaHub menu in the VSCode extension (Actions > Download results) and on the online platform underCompute > Job List.
To upload multiple result files with legacy job images, set RESULTS_FILE to a directory path. JuliaHub will tar up the directory contents:
path_results = "$(@__DIR__)/results"
mkdir(path_results)
ENV["RESULTS_FILE"] = path_results
# ...save files in path_results...
Distributed job
While the π simulation represents a trivial use case as it could have been easily run locally on any laptop, other jobs require higher compute resources. JuliaHub makes it seamless to execute computations on large clusters, thanks notably to the Distributed.jl functionalities.
using Distributed
function estimate_pi_distributed(n)
    n > 0 || throw(ArgumentError("number of iterations must be > 0, got $n"))
    incircle = @distributed (+) for i in 1:n
        x, y = rand() * 2 - 1, rand() * 2 - 1
        Int(x^2 + y^2 <= 1)
    end
    return 4 * incircle / n
end
To execute the job on a cluster, a distributed CPU job must be selected instead of the previous single-process CPU job. This will bring new options in the launcher configuration for the number of nodes (up to 100) and whether a Julia process should be launcher for each node or each vCPU.
By launching the script ./script_distributed.jl with the same configuration as the above, but this time using a distributed job with 10 nodes, the simulation completes in 1.35s, which is a 6.6 folds improvement over the previous single-process that took 8.94s.
Logging
As some jobs can take a long time to complete, being able to track their progress is a desirable feature. Such monitoring capabilities are made available simply through the usage of the common macros @info and @warn.
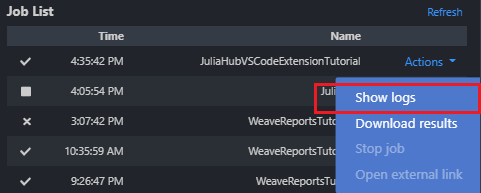
Live logs can be accessed by clicking 'Actions' -> 'Show logs' in JuliaHub's Job List section:
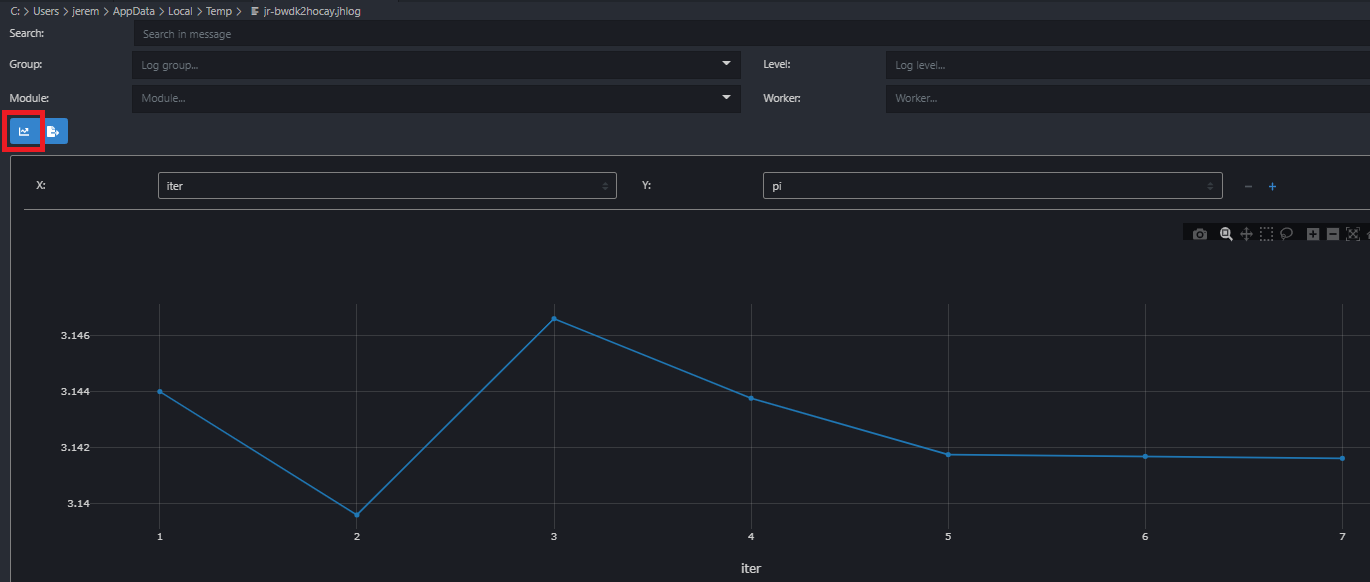
For example, in the context of an iterative job such as a simulation or the training of a model, the iteration iter and current evaluation measure metric can be logged by adding the following code within the loop:
@info "progress logging:" iter = i metric = stats[:value]By displaying the desired tracked items using the above format, the variables iter and metric will be made available in the job logs, which has a built-in plotting capability. The plot below was captured from the logs of the script script-logging.jl and shows the estimate of π against the iteration id for various number of trials (ranging from 1K to 1G):
Tutorial Example
To try out the VS Code extension with a complete example, you can use the JuliaHub VS Code Extension Tutorial repository:
git clone https://github.com/JuliaComputing/JuliaHubVSCodeExtensionTutorial.jlOpen the tutorial folder in VS Code and ensure that the working directory points to the tutorial's root folder (using pwd() in Julia's REPL). To activate the project, press ] key in the REPL to use the package mode, then type:
pkg> activate .This tutorial provides example scripts for both single-process and distributed computing scenarios, demonstrating how to estimate π using Monte Carlo simulation.