Datasets Introduction
Basic processing of datasets
Uploading and plotting simple datasets
Introduction
In this tutorial, we demonstrate how to upload a CSV dataset to JuliaHub and visualize the data by means of basic plots. See this tutorial for advanced usage and these getting started steps to connect to DataSets from a local IDE.
The list of files required for this tutorial is given below:
Note that the last two files are required if you wish to run the tutorial locally.
The first step is to download the files associated with the tutorial. Our toy dataset consists of only one CSV file called zoo.csv. The dataset contains fictional data representing the maximum and minimum age of purchased zoo animals (and their number) over a period of one year. As you can see, the dataset has been constructed to be quite basic, but you can easily extend this example to handle more complex datasets.
The remaining files: Project.toml, Manifest.toml, and loadZoo.jl contain the necessary code for uploading and plotting the data.
Remember to place the dataset and the data-processing files in separate directories. For a small dataset it doesn't really matter, but when you work with large input files, it's crucial not to upload your datasets with data-processing files.
We will now go through the whole process and demonstrate how you can easily create your own scripts for handling data. You could also use the loadZoo.jl file as a starting point and adapt it to your own computing needs.
Structure of the data
You can first inspect the dataset in Julia REPL by invoking the following commands:
julia> import Pkg
julia> Pkg.add("CSV")
julia> Pkg.add("DataFrames")
julia> using CSV, DataFrames
animals = CSV.read("/Users/me/Zoo_src/zoo.csv", DataFrame) # use your local path to the file
The output should look like this (note that the integer type depends on your CPU):
12×5 DataFrame
 Row │ Month      Animal     Min_age  Max_age  Count
     │ String     String     Int64    Int64    Int64
─────┼───────────────────────────────────────────────
   1 │ January    elephant         3        5      3
   2 │ February   lion             1        4      7
   3 │ March      zebra            2        2     14
   4 │ April      penguin          0        3     28
   5 │ May        gorilla          2       20      5
   6 │ June       panda            2        2      1
   7 │ July       giraffe          4        5      2
   8 │ August     camel            1        4      9
   9 │ September  rhino           10       24     10
  10 │ October    tiger            2        6      2
  11 │ November   sloth           10       12      3
  12 │ December   chameleon        1        1      1
Using datasets with JuliaHub
Uploading datasets to JuliaHub is very straightforward. There are two ways to do this: either via your web browser or via the VSCode extension. We will discuss both options. For more extensive functionality and IDE integration, please see the next section, Using datasets in VSCode.
There are restrictions on what can be used as a dataset's name on JuliaHub. Valid names must start with a letter or a number, the rest of the name can also contain - and _ characters. The names can also be hierarchical, with segments separated by forward slashes (/) or (.). Each segment must also start with either a letter or a number.
So, for example, my-analysis/my_table.csv or 2025-01-01---logs are fine, but a/../b or tables/-data are not.
In more technical terms, a dataset's name must satisfy the following regular expression:
[[:alnum:]]
(?:
    [-[:alnum:]_]      |
    \.(?=[[:alnum:]])  |
    \/ (?=[[:alnum:]])
)*
Uploading a dataset
You can upload datasets using JuliaHub's web interface.
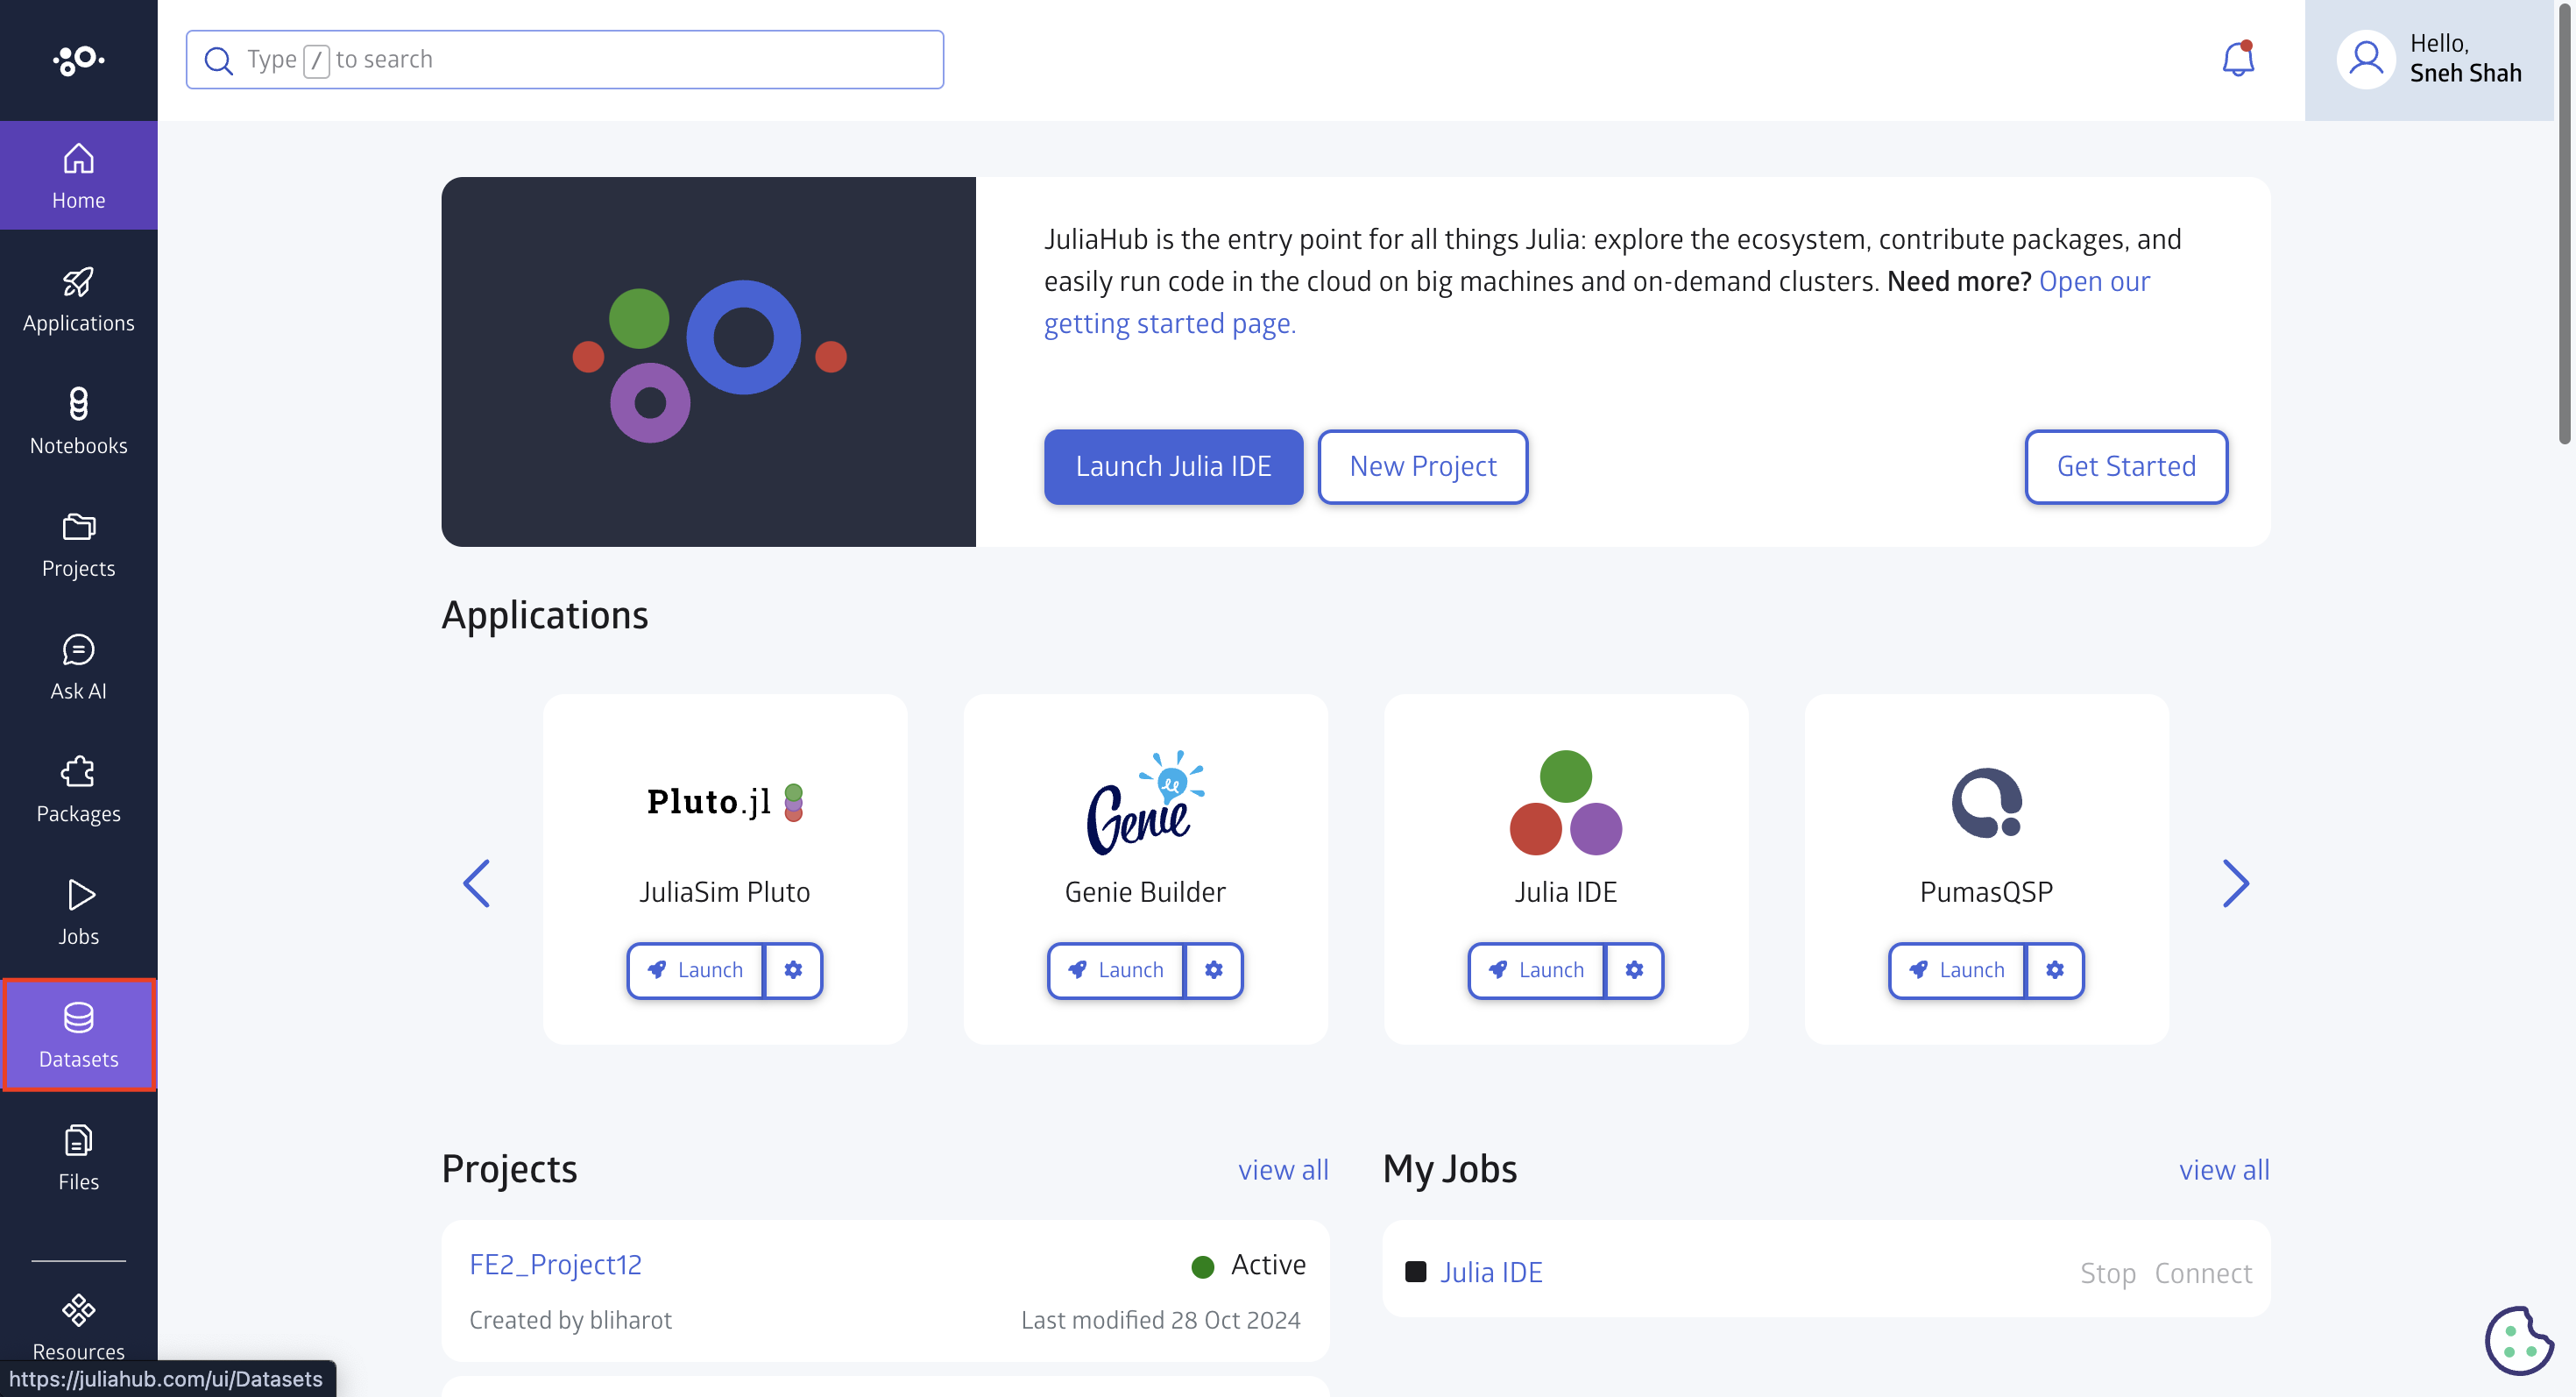
In the left menu on the homepage, click the Datasets:
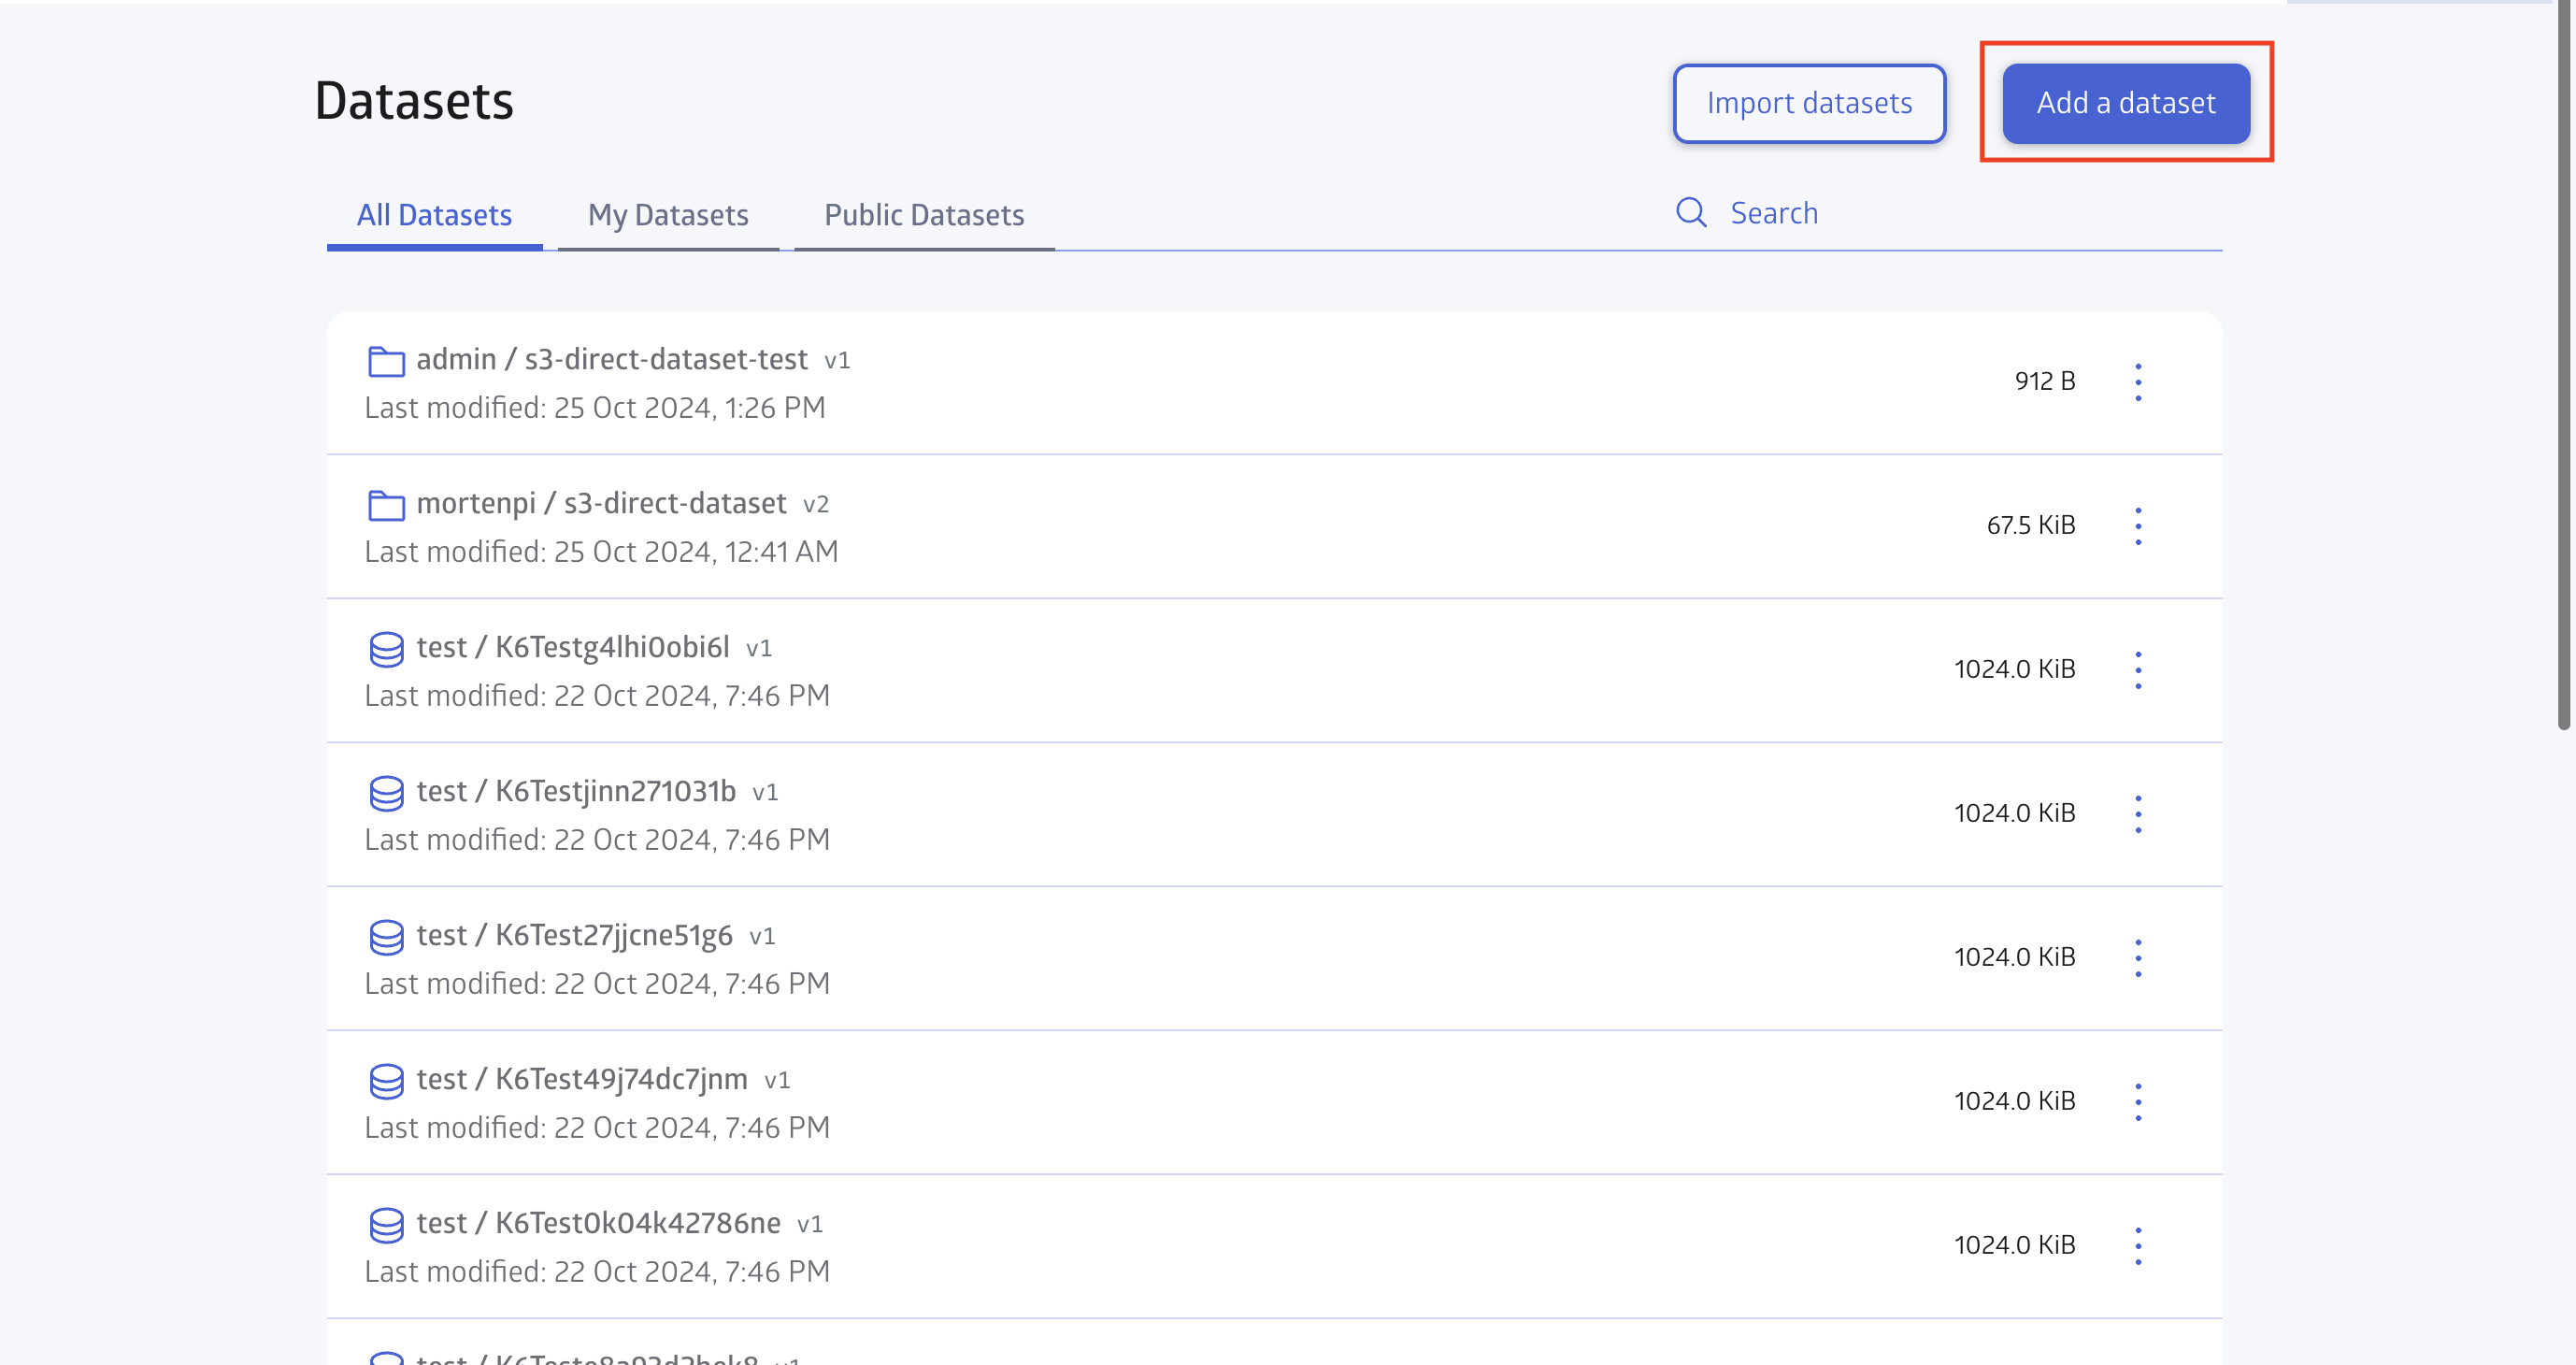
You will see the list of your datasets. Click Add a dataset at the top:
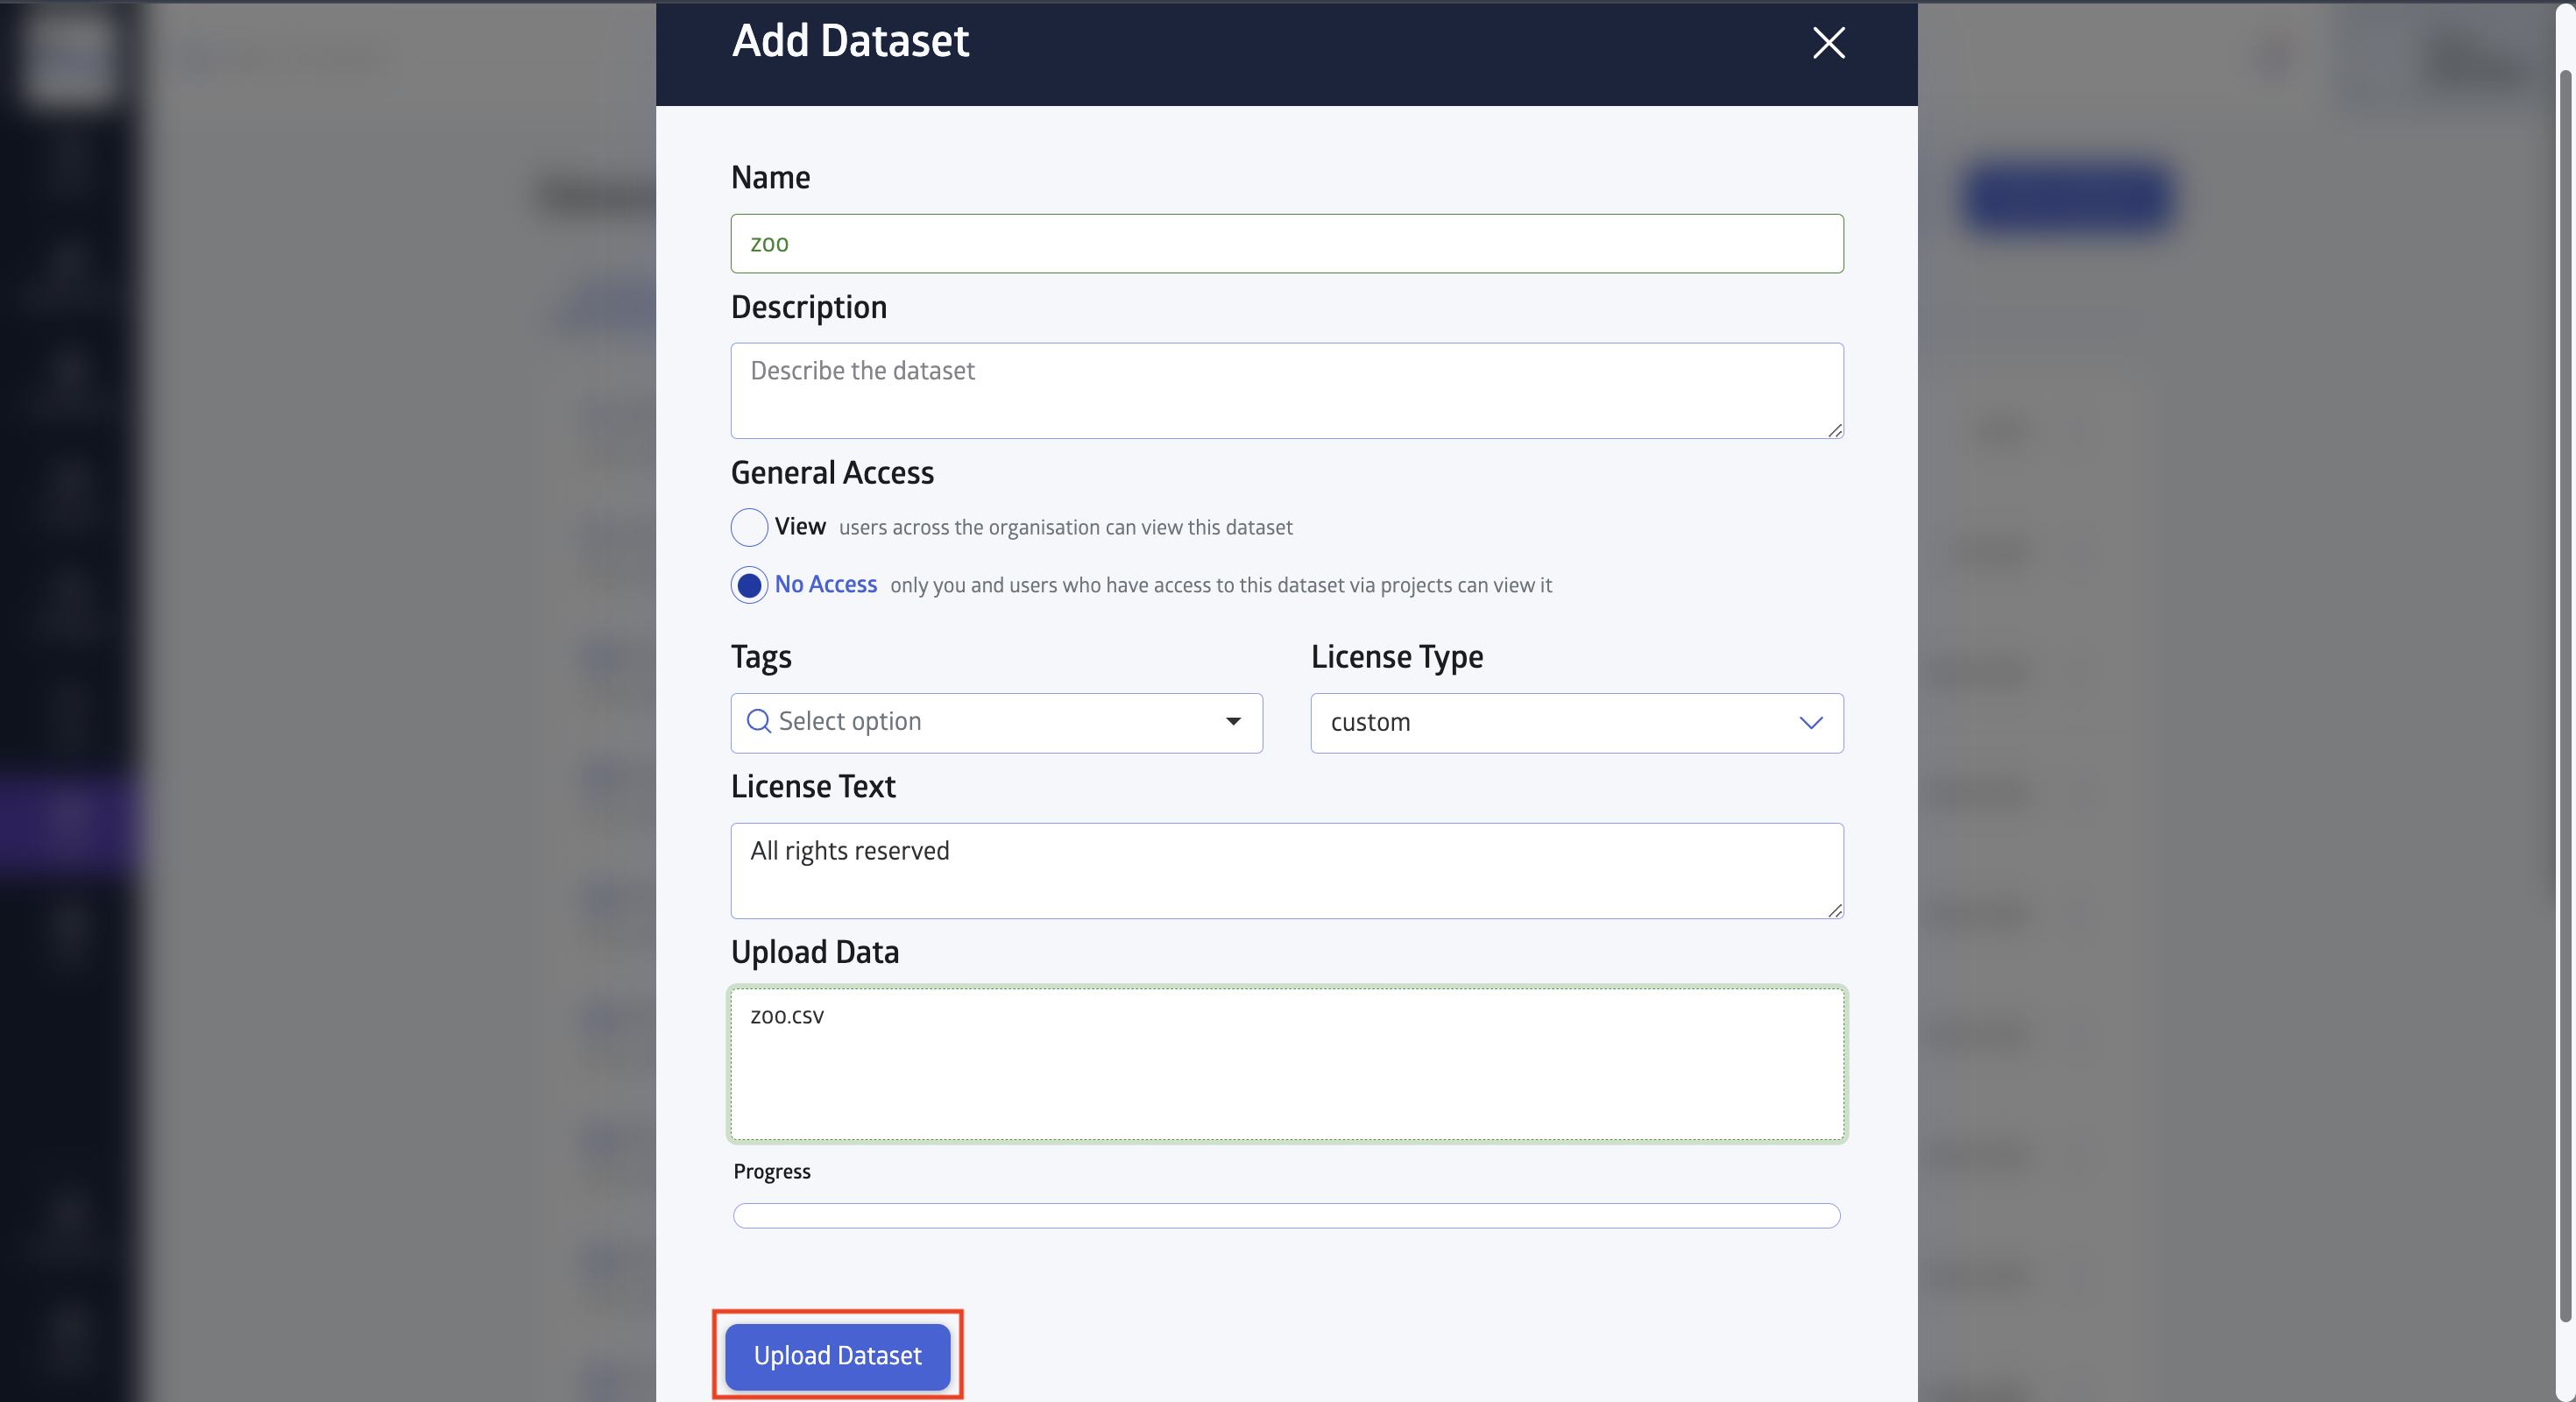
Name the dataset and upload it (note that JuliaHub currently only supports datasets that are a simple, tabular file), then click Upload Dataset:
Viewing a dataset
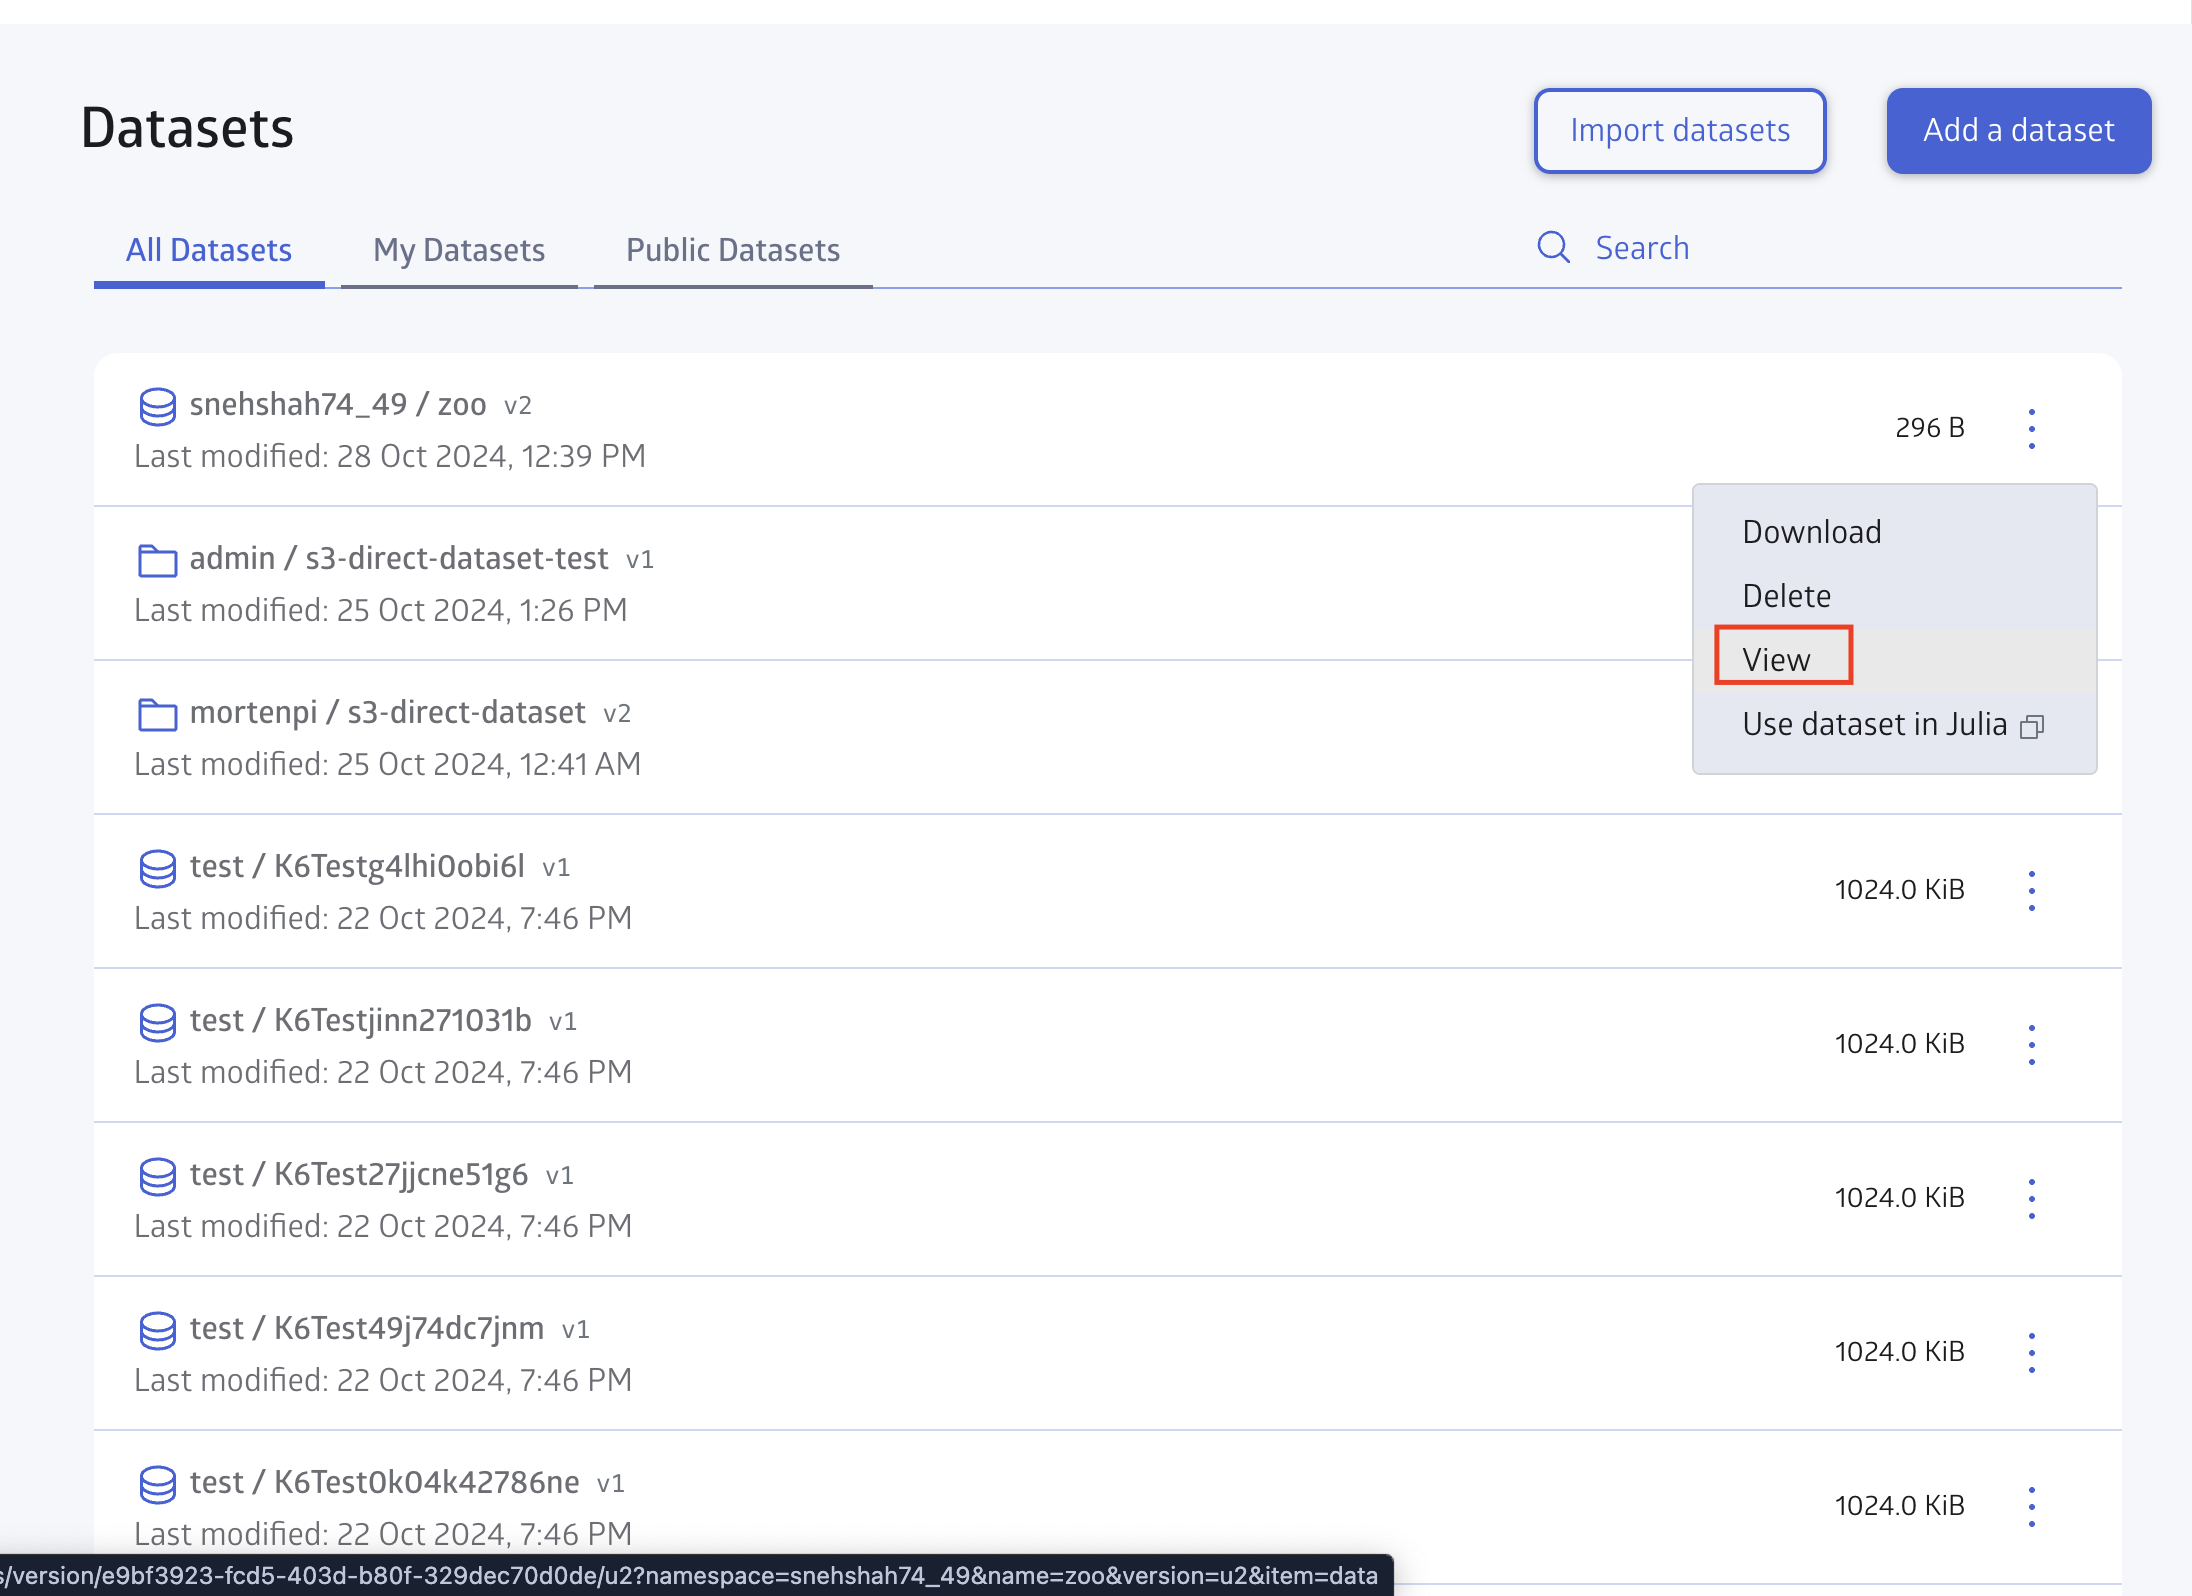
Once a dataset is uploaded to JuliaHub, you will see it in your list and you can view it by clicking on the view icon after your dataset's name:
If JuliaHub is able to detect that the dataset is a table, then it will show a tabular view. While viewing the dataset, you can sort by columns (shift-click additional columns to sort by more than one):
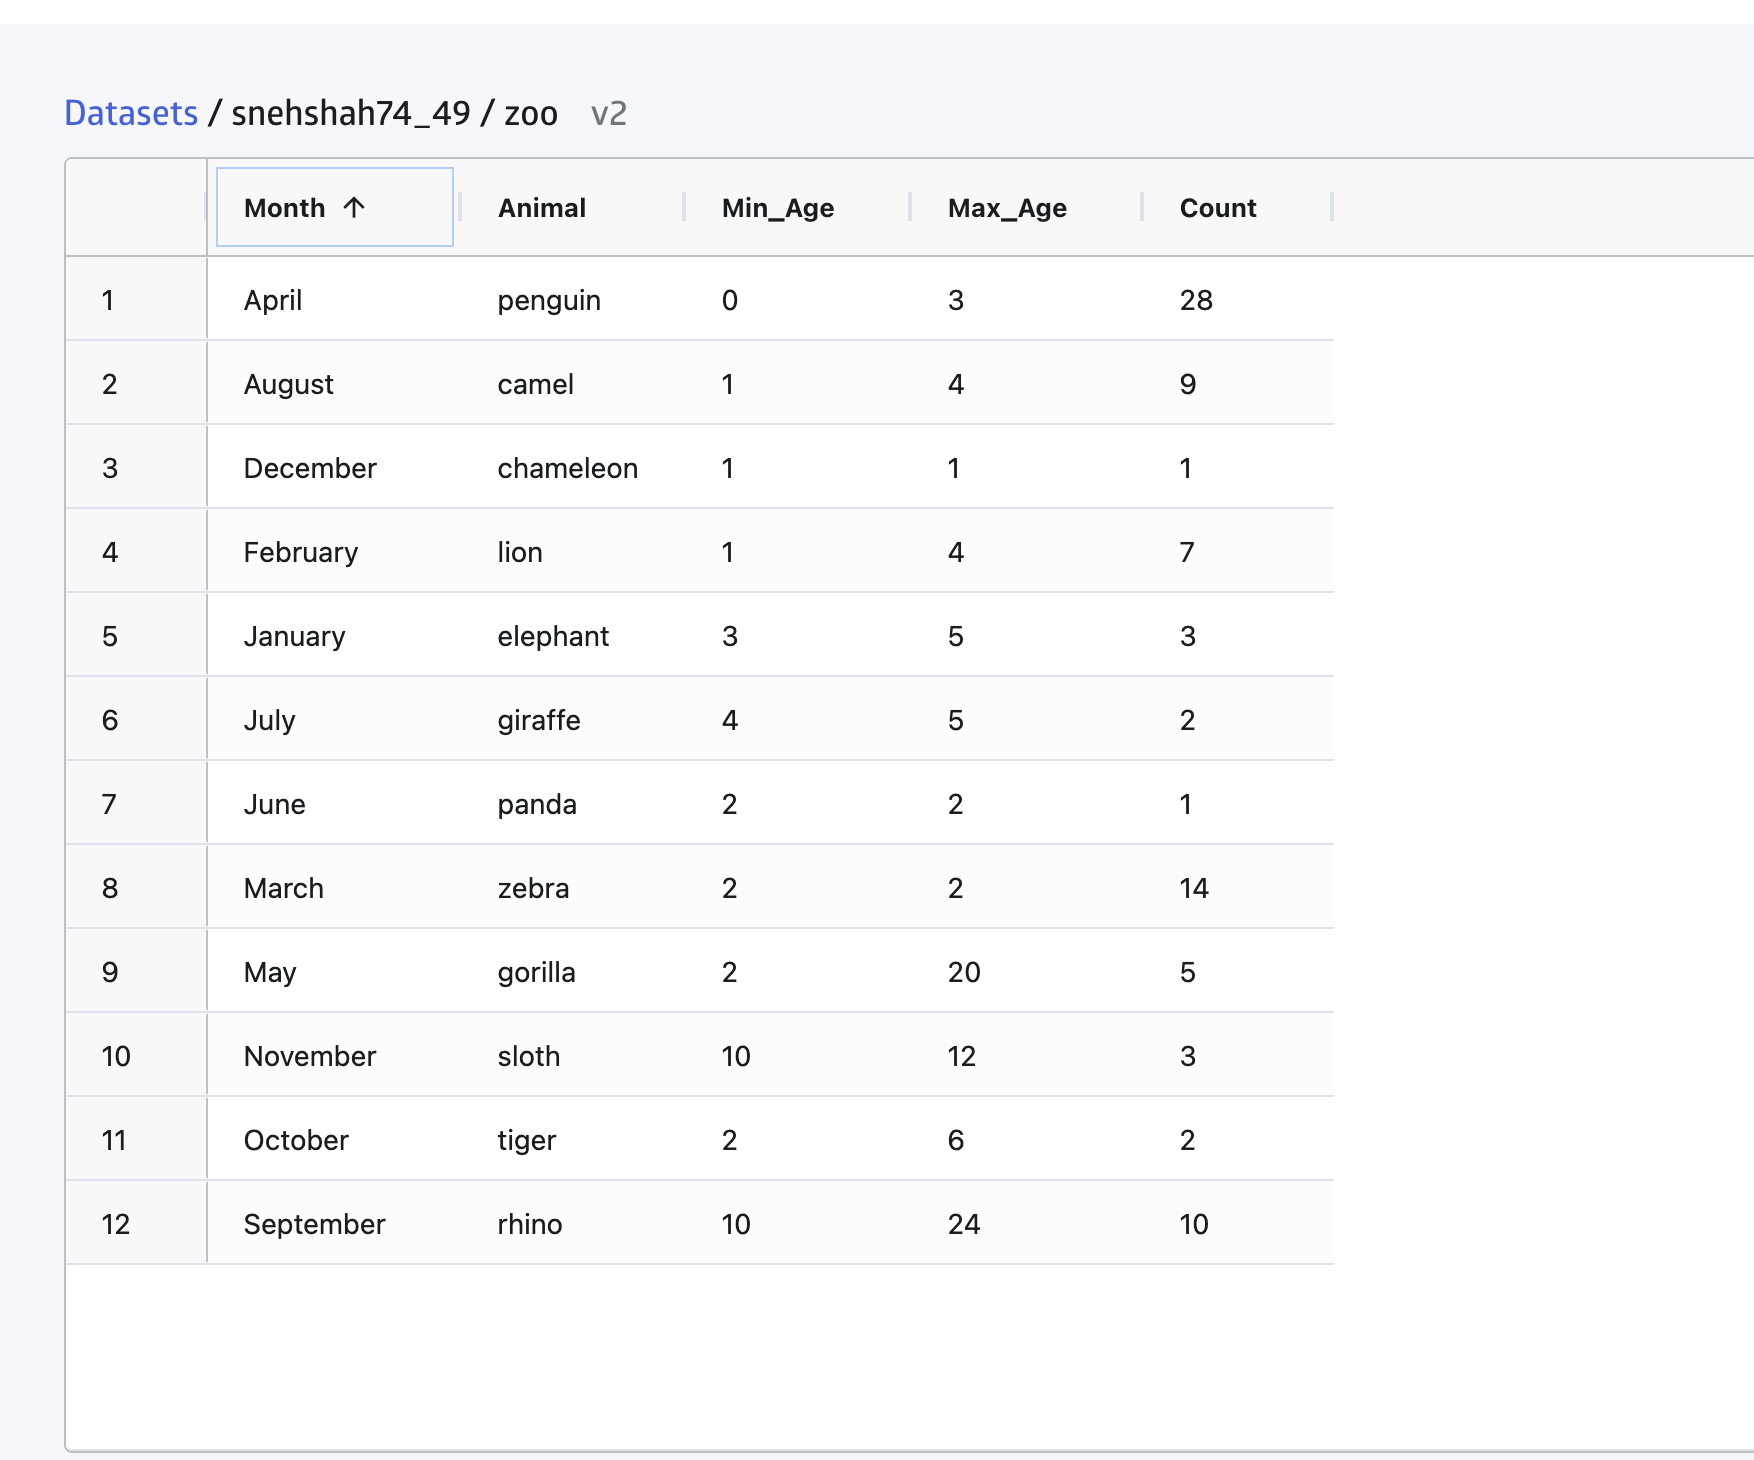
For tables, JuliaHub presently supports CSV, Arrow and Parquet files. If the dataset is too large, JuliaHub will not be able to display it in the web interface.
For multi-file (BlobTree-type) datasets, JuliaHub gives you a filesystem view of the files in the dataset:
Other dataset operations
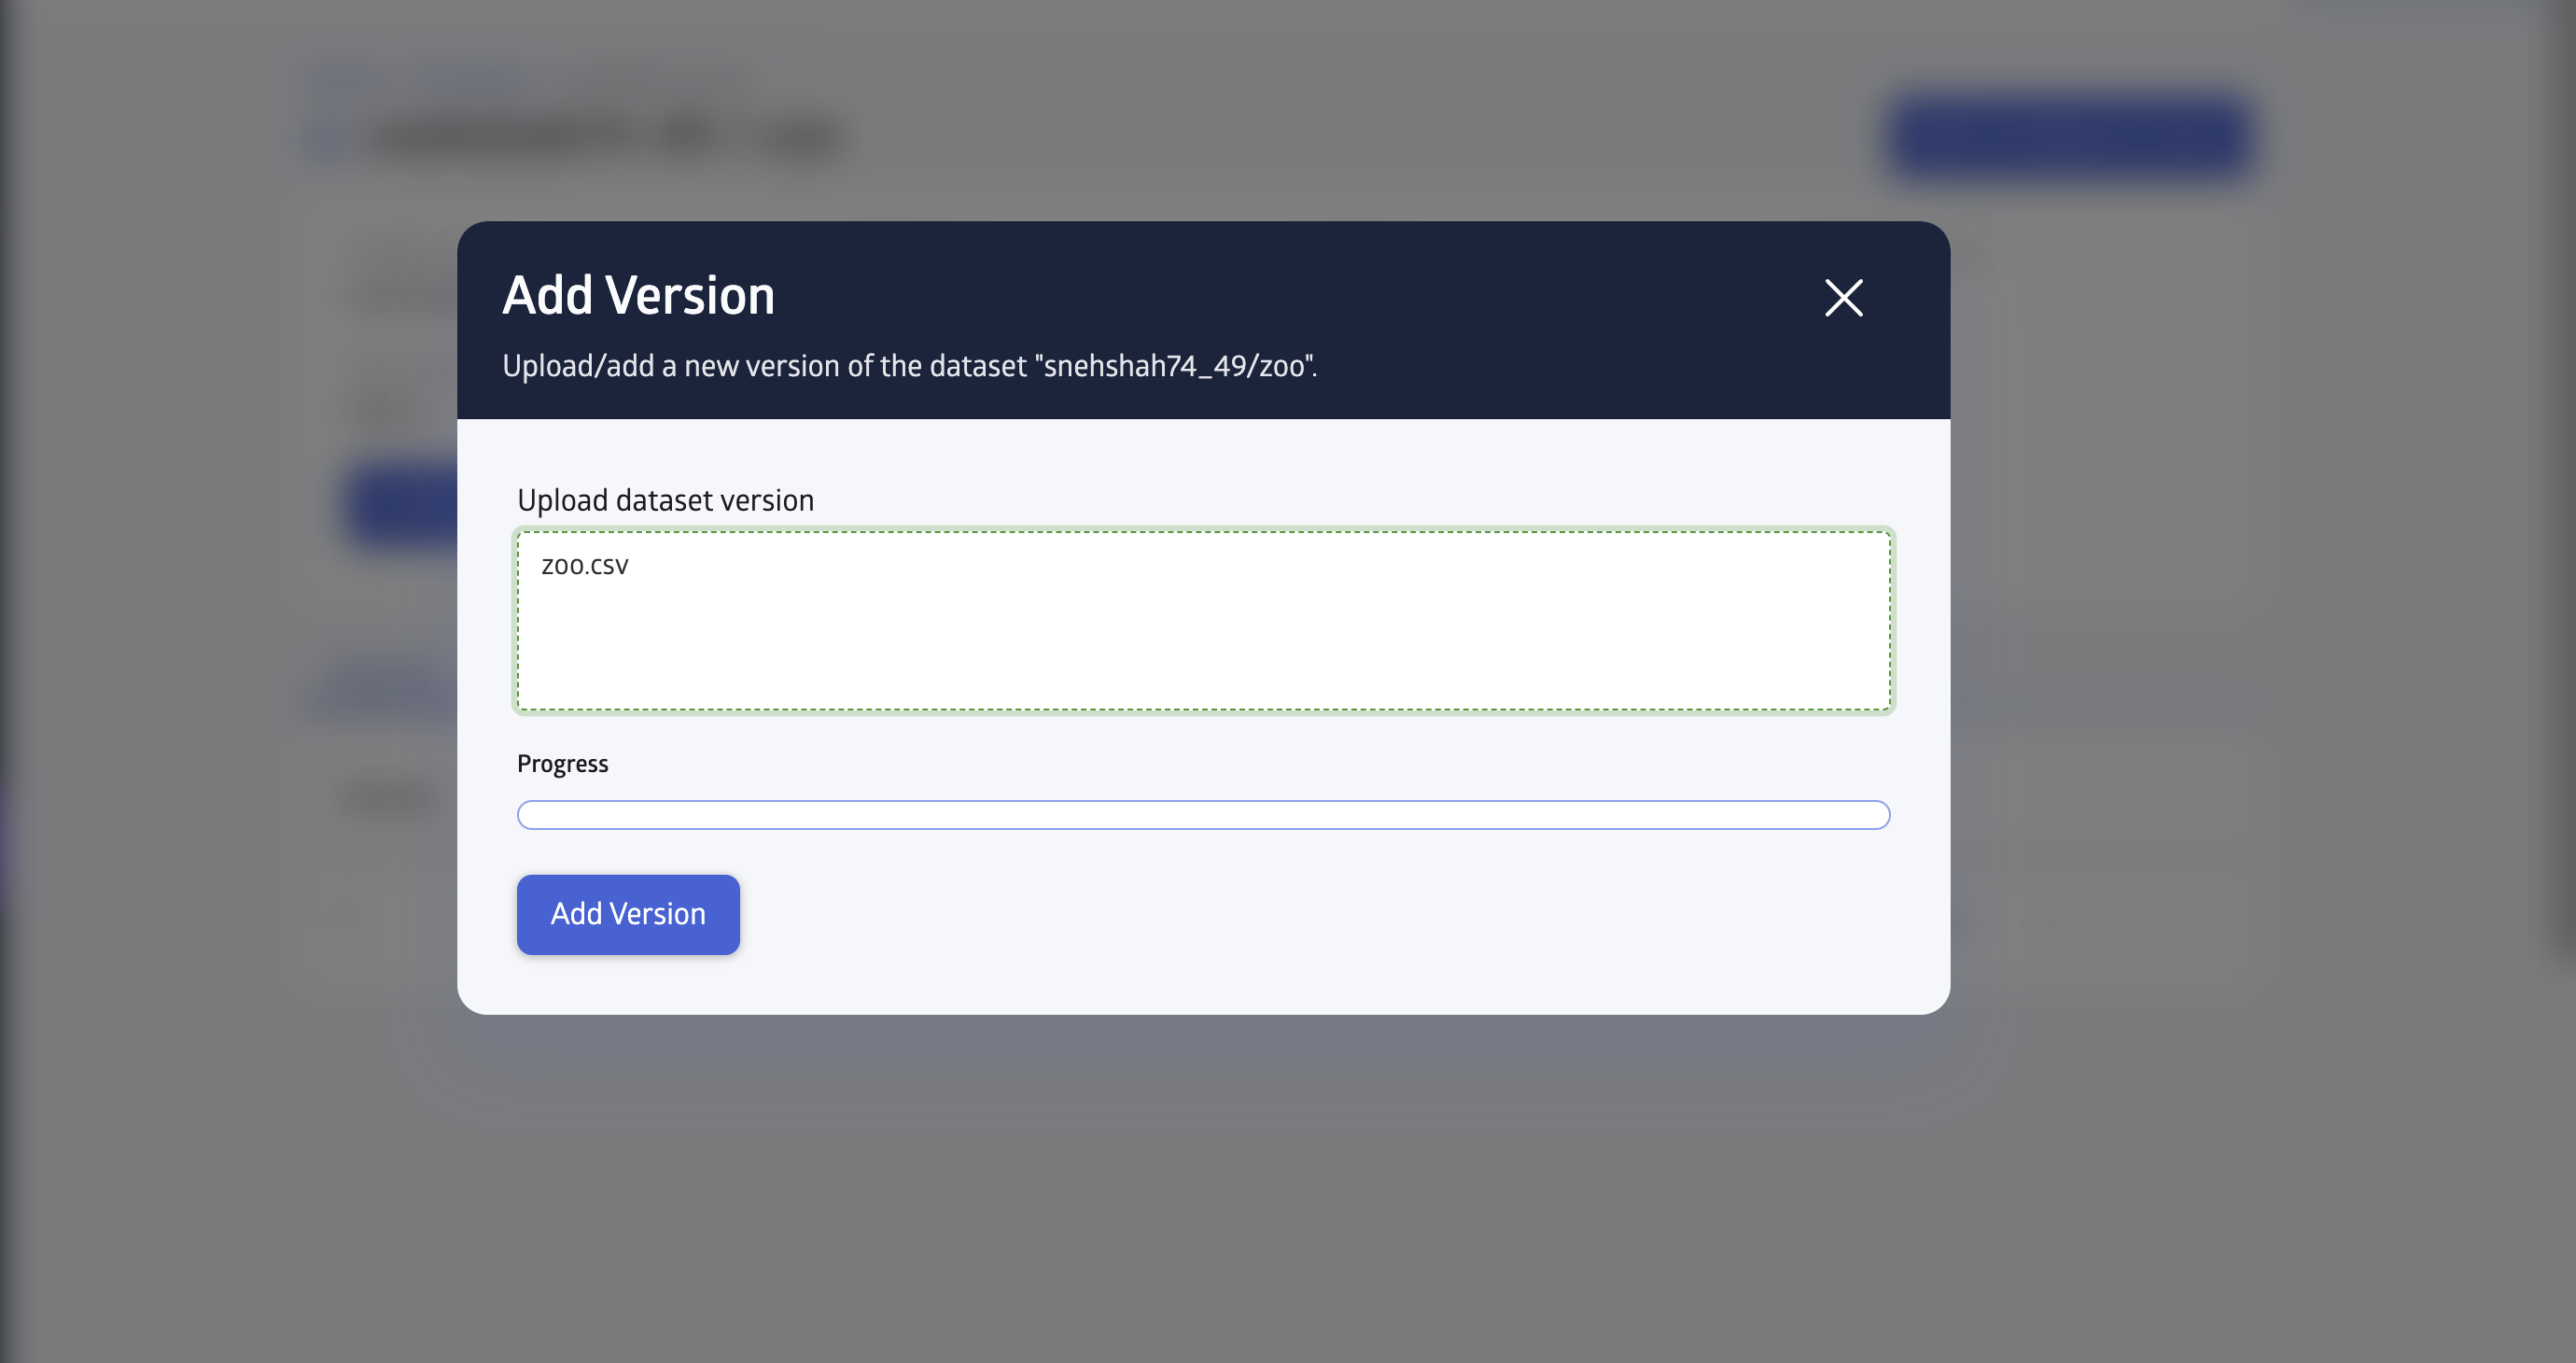
You can also download a dataset, upload new versions, edit its metadata, or delete it:
If you want to add the new version on your existing dataset click Add Version.

Once selected upload the new file and then click on Add Version and it will upload the new dataset.
Using datasets in Pluto
When copying the snippet to use the dataset, in applications like Pluto, you must also load the library by using:
using DataSets, JuliaHubDataUsing datasets in VSCode
VSCode configuration
In order to upload the code to JuliaHub, you should have the JuliaHub VSCode extension properly configured. If you haven't set it up yet, consult the tutorial before proceeding. Also note that JuliaHub currently uses Julia 1.7 (don't forget to change the environment in VSCode to 1.7 and the executable path in Julia extension).
Uploading the dataset
Open VSCode and invoke the command palette (macOS: Command + Shift + P, Windows: Ctrl + Shift + P). Find the command JuliaHub: Upload Folder as Dataset.

You will then be prompted to enter some metadata. Upload the dataset as zoo because this name will be later used in the processing file. Once you have successfully uploaded the dataset, you will see the following message in VSCode:

The zoo dataset should then appear in your 'Datasets' on JuliaHub, as discussed in the previous section, Using datasets with JuliaHub.
Running the data-processing code
On JuliaHub
The plotting file (loadZoo.jl) is quite simple:
using CSV
using DataFrames
using Plots
using DataSets
using StatsPlots
using Tar

ENV["RESULTS_FILE"] = results_dir

full_file = open(Vector{UInt8}, dataset("username/zoo")) do buf
    CSV.read(buf, DataFrame)
end
groupedbar(full_file.Month,
           [full_file.Max_age full_file.Min_age],
           labels = ["Max_age" "Min_age"],
           title = "Max/min age of purchased animals",
           size = (925, 450))
results_dir = joinpath(@__DIR__, "results")
mkdir(results_dir)
savefig(joinpath(results_dir, "animalsAge.pdf"))
scatter(full_file.Animal,
        full_file.Count,
        labels = "total number",
        title = "Total number of purchased animals",
        size=(925, 450))
savefig(joinpath(results_dir, "animalsCount.pdf"))
Note that if your result consists of a single file, you can also set the RESULTS_FILE environment to one file (for example, just one PDF plot).
ENV["RESULTS_FILE"] = joinpath(results_dir, "animalsAge.pdf")However, pointing to a folder is useful for real-world applications since the results will likely comprise multiple files.
Total results size (single file or tar bundle) is limited to 5GiB. Uploads exceeding this limit fail and the results will not be available for download. See Outputs for details.
In order to run the code on JuliaHub, you have to select it by clicking the command Use current file in the VSCode extension.

Once you have selected the script, you can adjust the job settings according to your needs. For this tutorial, it is recommended that you use a single-process job. As regards the cost/time limits, you don't have to worry because this tutorial is very lightweight and is not likely to incur costs of more than several cents. You are now ready to submit the job. Scroll down and find the 'Start Job' button:

Now wait patiently for the job to launch (in the worst case, the job could take up to 10 minutes). While waiting, you can follow the logs live by clicking 'Actions' -> 'Show logs' located next to the current job:

You should then see similar messages appear in a new VSCode tab:

You could also retrieve the logs via JuliaHub in the browser by navigating to the 'Run Code' tab and finding the 'Results' button next to the current job. See the following section for the relevant screenshots.
You can find more details on launching the code in this tutorial.
JuliaHub usernames may contain hyphens (-), but not underscores (_). In the past, JuliaHub changed the hyphens to underscores in dataset namespaces (for example, a username my-username would become my_username/... in dataset names).
Starting from JuliaHub 6.9, the exact username is used when referencing datasets in DataSets.jl. So if you want to access the dataset my-dataset-name owned by my-username, you would now use
dataset("my-username/my-dataset-name")However, the DataSets.jl integration is backwards compatible with the old convention as well. So the following
dataset("my_username/my-dataset-name")will keep working, albeit it will print a warning now.
Locally
You may skip this step if you are only interested in exploring JuliaHub. If, however, you would like to inspect the code in more detail, it might be a good idea to run it locally first. The local version of the main plotting file differs slightly from the loadZoo.jl in that it contains local paths and uses the zoo.toml file.
The zoo.toml file contains the necessary information to load the DataSets.jl project. It uses a custom UUID that is required for the file to work. You can easily generate your own UUIDs for future projects by doing:
import Pkg
Pkg.add("UUIDs")
import UUIDs
UUIDs.uuid4()
Sample output:
UUID("f71692d2-ae43-423d-a1ad-edde09771e7a")You can inspect the dataset's structure ('Blob') interactively as follows:
# launch Julia in the directory with 'zoo.toml'
import Pkg
Pkg.add("DataSets")
using DataSets
DataSets.load_project!(path"zoo.toml")
open(Blob, dataset("username/zoo"))
Sample output:
julia> DataSets.load_project!(path"zoo.toml")
DataProject:
  zoo => f71692d2-ae43-423d-a1ad-edde09771e7a
julia> open(Blob, dataset("username/zoo"))
📄  @ /Users/me/hub_tutorials/basic_datasets/zoo.csv
If you now run the loadZoo_local.jl file in the directory with the tutorial files (remember to add --project=. when launching Julia), you will see a new directory results appear, which contains two plots called animalsAge.pdf and animalsCount.pdf (see below).
Downloading the results
Once the job has finished successfully, you can download the results (in our case, the tarball) in two ways.
Either via VSCode:

Once you have extracted the tarball, you should see the following plots (called animalsAge.pdf and animalsCount.pdf):


Next steps
Congratulations on completing this tutorial! You now know how to upload and process basic datasets on JuliaHub. You should now be able to experiment with your own datasets. If you wish to learn more about generating and processing complex datasets, check out this tutorial.